
02/11/2020
By: Brennan Mudder and Josh Vetter
Introduction:
As we begin our research in the Immunity and Cancer Research Stream, we aim towards understanding the role of human APOBEC3 proteins in cancer development. So far we have begun to do this through DNA Isolation of HeLa cells, PCR amplification of miRNA, and agarose gel electrophoresis.
Research:
The past two weeks we have been using DNA that was isolated from HeLa cells to perform PCR and Gel electrophoresis. HeLa cells are an immortal human cell line and are used in many cancer research projects, such as this one. With the DNA we isolated from the HeLa cells we began the process of PCR amplification. PCR, polymerase chain reaction, takes a selected portion of DNA and amplify it into millions of copies. This is important so that we have the desired sections of DNA that we needed for research. To begin our PCR amplification process, we first needed to determine the concentration of isolated DNA with a NanoDrop. After we determined the concentration of DNA was within the desired ranges, we began PCR. The first step in the PCR process was making a “master mix” which contained all of the things necessary for PCR to take place. Our master mix contained four main components; Q5 2X master mix (a DNA polymerase), PCR water, and forward and reverse primers. The master mix is important to PCR because it contains nucleotides to build DNA and primers to build specific sections of DNA. After the master mix was created, we distributed it into two separate PCR tubes; one which contained master mix along with water to be used as a control, and the other containing the isolated DNA from the HeLa cells and master mix which was used as our active sample to amplify the miRNA. These two samples were then placed in a thermocycler, which is a machine that changes temperatures to allow the DNA to denature, the primers to anneal, and the DNA to extend. After the thermocycling was complete, the tubes were removed, and PCR was complete.
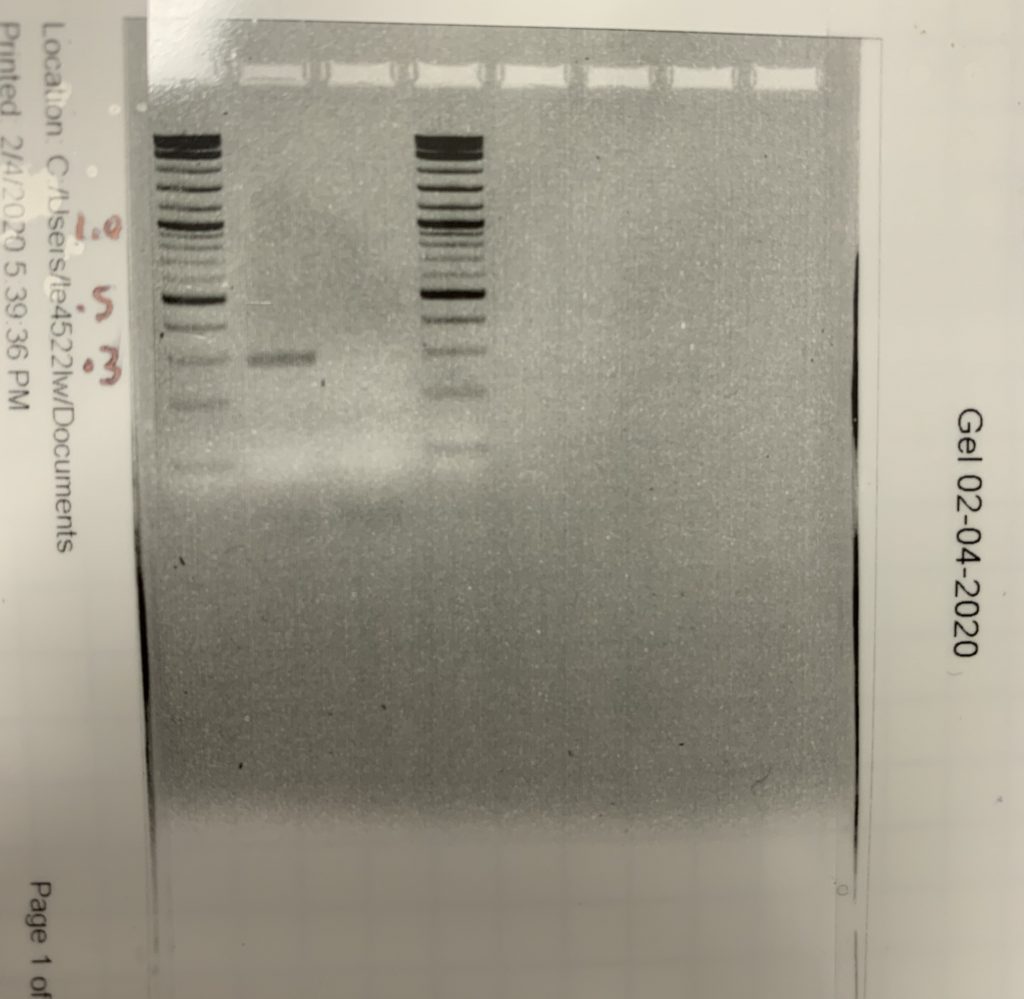
Now that our DNA had been amplified, we began to work on agarose gel electrophoresis. Gel electrophoresis is used to separate, identify, and measure DNA fragments. To begin we made an agarose gel which contained pores that the DNA was able to move through, and wells for our DNA, control, and DNA ladders to be placed. The gel was then placed into the gel tank, which has a positive and negative side. The samples were placed into the wells on the negative side allowing the negatively charged DNA to run to the positive side. Once the gel was ran it was taken to an imaging machine to be analyzed. The imaging machine took pictures of the gel allowing us to compare our active sample and control to the DNA ladders. After comparing the active sample and the control to the DNA ladder, it was determined that there was no error and the active sample was the correct size.
Reflection:
The PCR amplification and Gel electrophoresis protocols all went according to plan with positive results, with little to no issues. Things that caused small issues were a DNA pellet refusing to dissolve before the PCR process, and our concentration from the Nanodrop being too high. To overcome the first issue, we had to vortex and heat the DNA pellet in order to help it dissolve with little to no success. We decided to Nanodrop our DNA solution with the DNA pellet still not dissolved, and it ended up having too high of a concentration. In order to fix this, we had to dilute our solution. From these things we learned how to overcome these small issues involving PCR and gel electrophoresis.